Datadog Workflow Automation lets you organize and automate your tasks. You can build workflows that connect to your tools and infrastructure. These workflows can also work with data and logic, allowing you to make complex flows with branches, decisions, and data operations.
With Workflow Automation, you can automate tasks in response to Datadog alerts and security signals. It uses real-time data, so you can fix problems faster and keep your systems running smoothly and securely.
This guide shows you how to make a custom workflow that starts when a monitor alert goes off. When this happens, the workflow creates a task in Jira and sends a message to Slack with a link to the Jira ticket. This guide also covers passing data between steps in your workflow, saving and sharing your workflow automation Datadog, and seeing the history of your workflow runs.
What Is Datadog Workflow Automation?
Datadog Workflow Automation lets you organize and automate your tasks from start to finish. You can create workflows that link to your tools and systems. These workflows can work with data and logic, so you can build complex flows with choices and actions.
Datadog Workflow Automation gives you over 400 actions for different tools, plus special workflow actions like HTTP and JavaScript data operators. These actions help you do anything you need in your workflow.
Datadog also has pre-made workflows called blueprints. These blueprints help you build processes for things like incident management, DevOps, change management, security, and fixing problems.
The Workflows Overview dashboard shows you a summary of your Datadog workflows and what they did. You can find it in your Dashboard list.
Below are some typical examples of workflows with Datadog you can build:
- Automatically change the size of your AWS groups when important measurements go into alert mode.
- Create reports of harmful IPs found by Security Signals and then block them in CloudFlare with one click.
- Run workflows to go back to stable versions of your app directly from your dashboards.
- Manage feature flags by automatically updating config files in GitHub and handling the pull request and merge process.
How to Build the Datadog Workflow Automation?
Below are 5 main steps to create the Datadog Workflow Automation. Let’s explore!
Build a Workflow with a Monitor Trigger
You can start a workflow when an alert goes off, on a schedule, or by hand. In this case, we’ll make a workflow that starts with a monitor alert.
Make a workflow:
- On the Workflow Automation page, you click “New Workflow”.
- Name your workflow and describe what it does. This example workflow uses:
- Name: “Create a Jira Ticket”
- Description: “Create a Jira issue and Slack notification when there is a monitor alert.”
Add and set up the monitor:
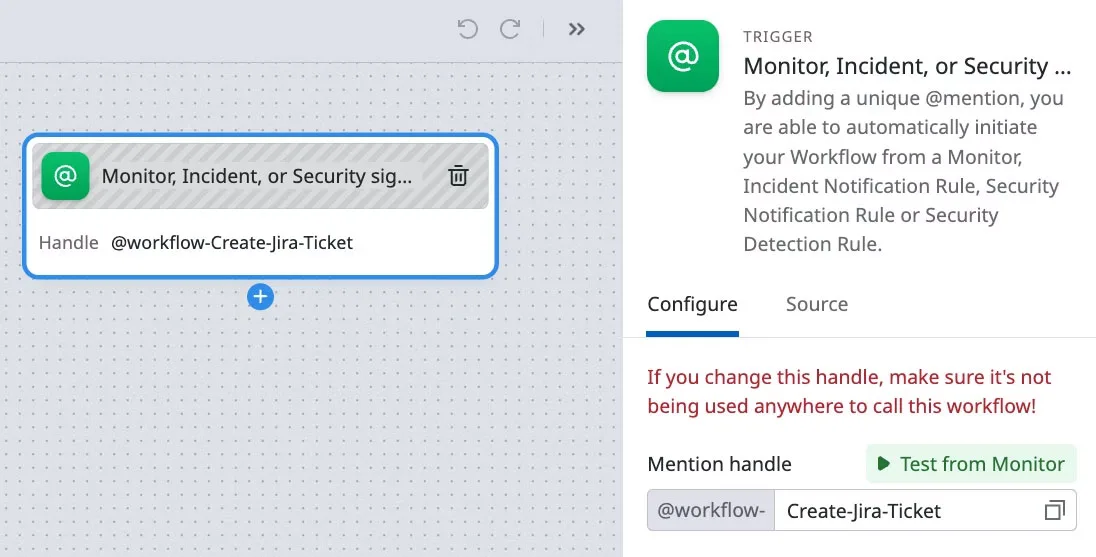
- On the workflow page, click “Add Trigger” and choose “Monitor, Incident, or Security Signal”.
- In the “Configure” tab, next to “@workflow-“, type in a unique ID for your workflow, like “Create-Jira-Ticket”. This ID is used to connect the workflow to a monitor notification.
- You have to click “Save” to save your workflow.
Add the Jira and Slack Actions
Add and set up the Jira step:
1. Click the “+” icon on the workflow page.
2. Look for the Jira action and choose “Create issue”.
3. Click on the “Create issue” step on the workflow page.
4. In the “Configure” tab, pick a Jira Account that matches the Jira URL in the “Accounts” section of the Jira integration tile.
5. Type in the “Project” and “Issue type” for the Jira issue the workflow will make.
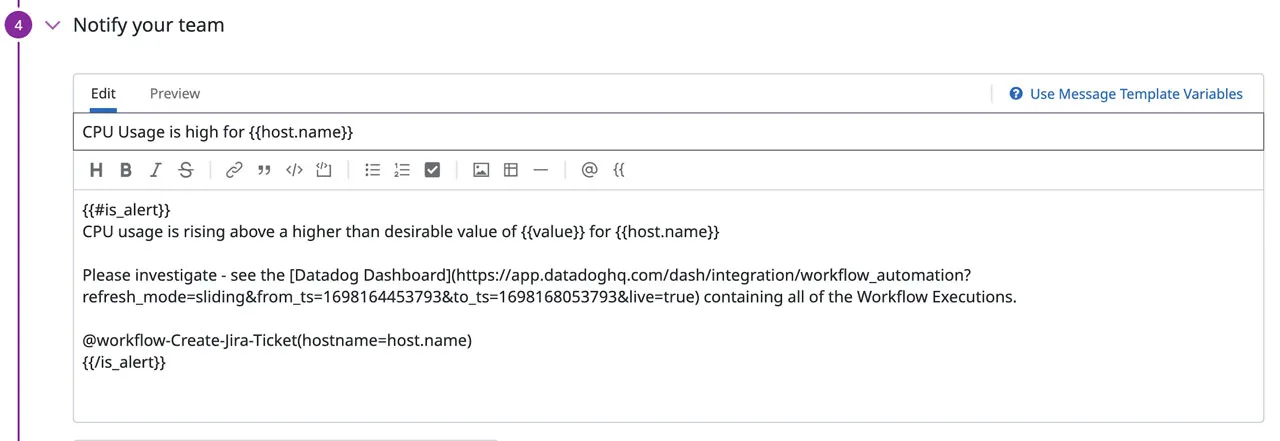
6. Type in a “Summary” and “Description” for the Jira issue. Use special variables to add info from the monitor alert that starts the workflow. You can use a variable by putting it in double curly braces ({{).
For example, this description uses variables to show:
- The source of the monitor alert
- A link to the monitor that had the alert
- The name of the workflow, and the workflow ID
The CPU usage is above the 95% threshold for {{ Trigger.hostname }}
Please investigate – see this Datadog Dashboard to view all workflow executions:
https://app.datadoghq.com/dash/integration/workflow_automation?refresh_mode=sliding&from_ts=1698164453793&to_ts=1698168053793&live=true.
The workflow that created this Jira issue is
{{ WorkflowName }} : {{ WorkflowId }}
The monitor that triggered the workflow can be found here: {{ Source.url }}
7. Try the Jira action by clicking “Test”. This will create a real Jira ticket.
8. Click “Save”.
Next, add the Slack step:
Click the plus icon on the workflow page to add another step.
1. Look for Slack and choose “Send message”.
2. Type in the Slack Workspace name.
3. Type in the Slack Channel name.
4. To make the Slack message more helpful, use special variables that pass info from the Jira step to the Slack step. Use this message text to include the Jira issue key, monitor name, and Jira issue link in the Slack message:
The monitor named {{ Source.monitor.name }} triggered and created a new Jira issue
{{ Steps.Create_issue.issueKey }}: {{ Steps.Create_issue.issueUrl }}
The workflow that created this Jira issue is {{ WorkflowName }}
5. Click “Test” to try the action, and then it will send a real Slack message.
6. To see your workflow’s name in the monitor’s notification menu, save and publish your workflow. Click “Publish” on the workflow page.
Test & Publish the Workflow
1. You need to click “Save” to update your workflow. Next, start the workflow yourself to test it.
2. To start the workflow, click “Run” on the workflow page and enter the information for the trigger variables.
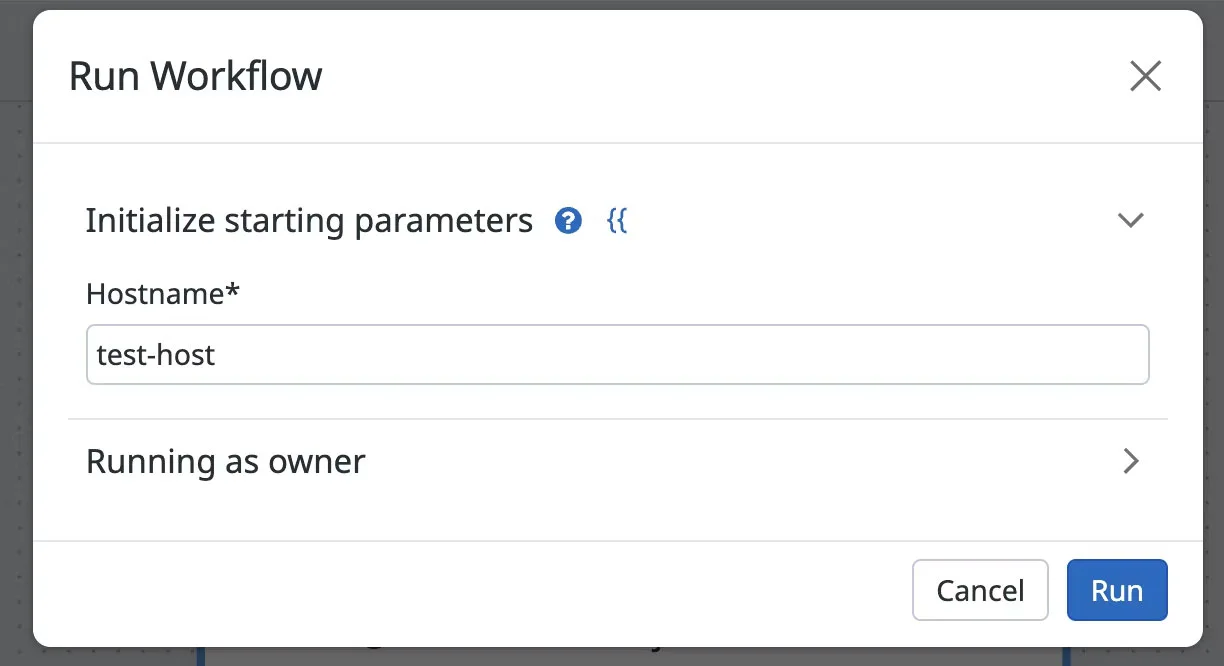
3. Make sure that running the workflow creates a Jira ticket and sends a Slack message.
4. Workflows that are scheduled or triggered won’t start automatically until you publish them. To publish the workflow, click “Publish” on the workflow page.
Update the Monitor Triggers
1. Go to the Monitors page in Datadog.
2. Find the monitor you want to use to start the workflow and change it, or make a new monitor.
3. In the message section, add the full workflow name to an alert notification. The name starts with “@workflow-“. For example, “@workflow-Create-Jira-Ticket”.
You can add extra information to the workflow using a comma-separated list with the format “@workflow-name(key=value, key=value)”. For example, “@workflow-Create-Jira-Ticket(hostname={{host.name}}).
4. Click “Test Notifications” to try out the workflow and all the monitor’s notifications.
5. Save the monitor.
Each time the monitor reaches its limit, it will start a workflow run.
Run History
After you start the workflow, you can watch how it’s doing and fix any problems on the “Run History” page. Choose a step to see what went in and out, what was happening when it ran, and any error messages. In the example below, a step failed because the Jira settings were wrong.
To change your workflow, click “Configuration”. To go back to the run history, click “Run History”.
To see a list of past workflow runs and if they worked or not, use the main run history view. Go back to this view anytime by clicking on the workflow page.
Datadog Workflow Automation Pricing
First you will have the opportunity to try Datadog’s Core collection and visualization features for free with 1-day metric retention and 5 hosts. Here are four plans that Datadog offers:
- Pro Plan: 15$/host/month
- Enterprise Plan: 23$/host/month
- DevSecOps Pro Plan: 22$/host/month
- DevSecOps Enterprise Plan: 34$/host/month