Let’s make automatic tasks to help your team work better with Hubspot workflow automation. Set rules to automatically include records and take actions on your contacts, companies, deals, quotes, and tickets. You can also update information on related records, like a company connected to a contact.
After making your workflow, you can find it in the “Created in workflows” tab on your workflow dashboard. Workflows you made from other tools (like forms, emails, tickets, or deals) will show up in the “Created in other tools” tab. Find out more about organizing your workflows.
What is HubSpot Workflow Automation?

HubSpot is a tool that helps with all aspects of marketing and uses the inbound methodology. It’s easy to use and has great tools for analyzing data. We at ManoByte love HubSpot and are experts at using it. It’s a powerful marketing software, but it takes time to learn how to use it well. HubSpot is probably one of the best marketing tools out there, and it gets better every year with new features and abilities.
How to Create Hubspot Workflow Automation?
Here are detailed guidelines to create Hubspot workflow automation. Let’s explore and take note!
Select Workflow Object & Type
In the workflows tool, you can make a new workflow yourself or use a template to help you. You can also check out the library of community workflows for ideas.
Depending on how you start, you’ll be asked to choose a type of object and workflow. The number of workflows you can create depends on your subscription.
To start making a Hubspot workflow automation:
1. In your HubSpot account, go to Automations > Workflows.
2. You can make a new workflow in two ways:
- To start from scratch, click Create workflow > From scratch.
- To use a template, click Create workflow > From template.
3. To change or copy existing workflows, hover over the workflow and click Clone or Edit.
Start from Scratch
To make a new Hubspot workflow automation:
1. On the left side, choose what kind of things the workflow will work on (contacts, companies, deals, etc.). This decides what can be included in the workflow. You can choose from:
- Contacts
- Companies
- Deals
- Quotes (if you have Sales Hub Professional or Enterprise)
- Tickets (if you have Service Hub Professional or Enterprise)
- Custom objects (Enterprise only)
- Conversations
- Feedback submissions (if you have Service Hub Professional or Enterprise)
- Subscriptions
- Payments
- Goals
- Leads (if you have Sales Hub Professional or Enterprise)
2. On the right side, under “Choose type”, pick the kind of workflow you want:
- Blank workflow: Start with a blank one and add your own triggers, actions, and delays.
- Scheduled workflow (if you have Operations Hub Professional or Enterprise): Set up a schedule for your workflow to repeat daily, weekly, monthly, or yearly. Then add your own triggers, actions, and delays.
- Specific date or Contact date property (for contact-based workflows only): Start with a blank workflow and add actions that happen on a certain date, or dates set in a specific property on the records.
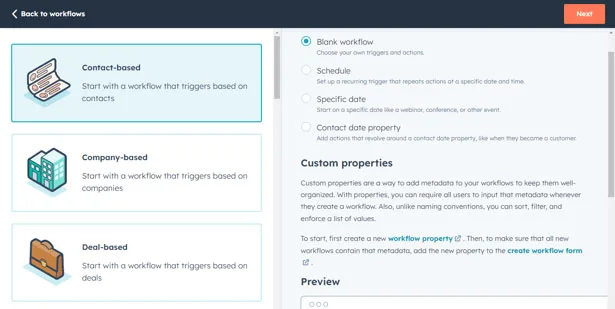
3. Click “Next”.
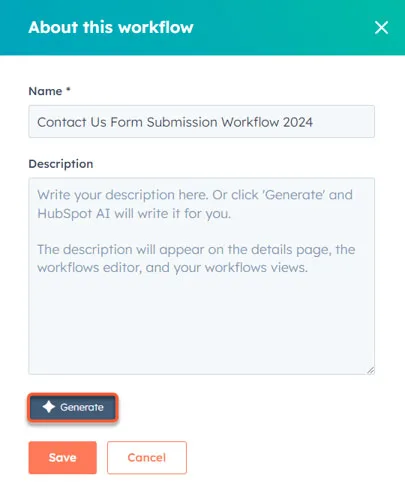
4. Click the pencil icon to give your workflow a name and describe it. You can also use HubSpot’s AI to make a description for you.
5. Click “Save”.
Use a Template
Use a Hubspot workflow automation template that fits your goals to make automation easier. You can also browse the templates to see different automation options.
To make a workflow using a template:
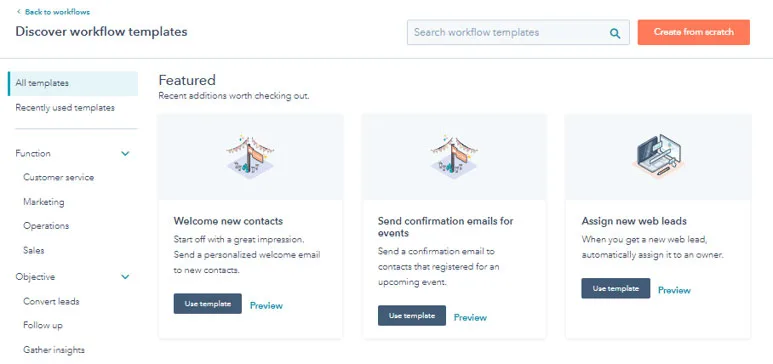
1. In the template library, look for a template that matches what you want to do.
- To filter by what the template does, choose a category on the left side.
- To search for a specific template, type in a keyword at the top right.
2. To see more details about a template, click “Preview”. This shows you if the template works with your HubSpot subscription and other details like:
- Purpose: What the workflow is for and what it tries to achieve.
- Included triggers and actions: What starts the workflow and what it does.
- What you need to prepare: Anything you need to get ready, like marketing emails or forms, to fill in the template.
3. When you find a template you like, click “Use template”. The template will open in the workflow editor with blank spots where you can add your own details. You can change, add, and remove actions as needed.
Set Enrollment Triggers
Enrollment triggers are a set of criteria that determine when a record is automatically added to your workflow. These triggers can be based on filters (specific conditions that records must meet) or events (actions that occur within your system). If you prefer to manually add records to the Hubspot workflow automation, you can leave the enrollment trigger box blank.
To get started with setting up enrollment triggers, follow these steps:
1. In the workflow editor, click on “Set up triggers.” This will open the enrollment trigger settings.
2. In the left panel, choose between “When an event occurs” or “When filter criteria is met” depending on how you want your trigger to be activated.
3. If you select “When filter criteria is met,” choose the specific filter type you want to use (e.g., contact property, company property, deal property, etc.). Then, configure the trigger criteria and click “Save.”
4. By default, records will only be enrolled in the workflow once, the first time they meet the enrollment triggers. If you want records to be re-enrolled in the workflow if they meet the trigger criteria again, you can enable re-enrollment:
- In the left panel, click on the “Re-enrollment” tab.
- Toggle the “Re-enrollment” switch on.
- Select the specific triggers that you want to use for re-enrollment.
5. If you need to add additional enrollment triggers, repeat steps 2 and 3.
6. Once you have configured all your desired enrollment triggers, click “Save” to finalize your settings.
Add Actions
You can use AI tools to create actions for your workflow or pick and add them yourself. For example, you can use a workflow to send a marketing email or assign tasks to people. Learn more about the different actions you can use in Hubspot workflow automation.
After adding an action, you can copy or move it to make building your workflow easier. If you want to leave a note about an action, you can add comments to it.
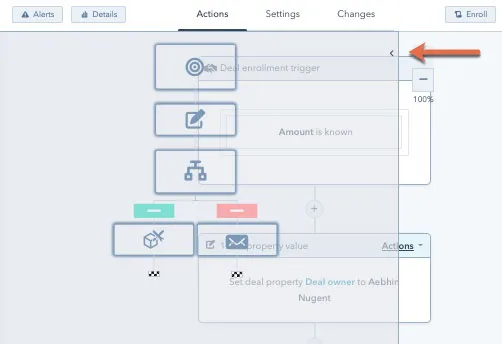
To add actions to a workflow:
1. Click the “+” icon.
2. On the left side, choose an action.
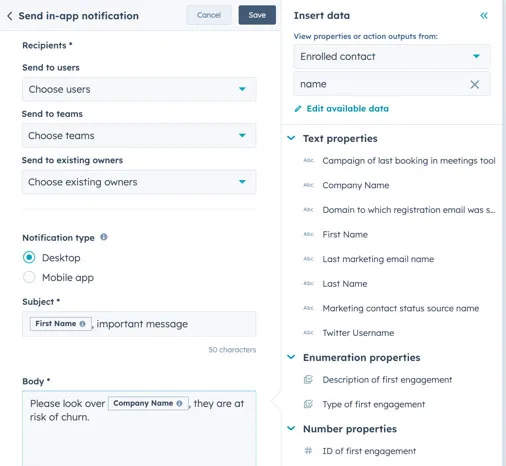
3. Depending on the action, you can use the data panel to get information from different sources. For example, you can use data from a contact and their deal to send a message to the person in charge of the deal.
You can use the data panel with these actions:
4. Send internal email notification
- Create task
- Send in-app notification
- Value equals branch
- Set property value (for text properties)
- Copy property
- Create record (for text properties)
- Send Slack notification (needs Slack connected)
- Format data (if you have Operations Hub Professional or Enterprise)
- Webhook (if you have Operations Hub Professional or Enterprise)
5. To use the data panel:
- Add a data source: In the “Available data” section, click “Edit available data”, then click “+ Add data source”. Choose the type of data and add the details.

- Use data from a source: In the “Edit action” tab, click on the field you want to use the data with. Then, click on the data source you want and the information you need.
6. After setting up the action, click “Save”. If you’re just adding a placeholder action, you can click “Save” without filling in the details. Placeholder actions need to be filled in before you can turn on the workflow.
7. Click the “+” icon to add more actions.
8. For big workflows, use the minimap to see your workflow and move around quickly.
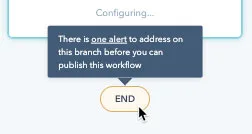
9. If your workflow needs changes before it can be published, the end marker will be yellow. Click the link in the alert to see what needs fixing.
Undo or Redo Changes
When you’re changing your workflow automation Hubspot , you can undo or redo the changes you made within the last 30 days.
Note: You can’t undo or redo changes to extension actions, custom code actions, or moving or copying actions.
To undo or redo changes:
- Go to the workflow editor.
- To undo an action, click the undo icon at the top left. It will undo one change at a time.
- To redo an action, click the redo icon at the top left. It will redo one change at a time.
Manage Settings
To change your Hubspot workflow automation settings:
- Click the Settings tab at the top left to control how the workflow runs and sends notifications.
- Click Edit > Edit enrollment trigger at the top left to manage how records are added to, removed from, or re-added to the workflow.
Read more: